


HX220 Wi-Fi Range Extender Setup
September 25, 2023 5:24 pmTP-Link HX220 Wi-Fi Range Extender
Whole Home Mesh Wi-Fi unit – Standalone Setup
The TP-Link HX220 allows you to extend Wi-Fi coverage throughout your home.
If you’re encountering ‘Wi-Fi blackspots’ or live in a large or double-storey house, the HX220 works with ‘EasyMesh’ compatible routers to extend your Wi-Fi network coverage.
You can set up multiple HX220s across your home to extend the coverage of your Wi-Fi network to various rooms or levels.
The HX220 is available for purchase from Activ8me as a standalone product, which you can set up with your existing router or in a bundle with our TP-Link vx230v Wi-Fi router.
When purchased in a bundle, the HX220 is paired by our team to the vx230v router before we send it to you, so it’s set up to work as a Wi-Fi range extender immediately out of the box.
Please note your Wi-Fi router must be ‘EasyMesh’ compatible – the best way to check this is by searching your router model on your router manufacturer’s website.
Included Features
The HX220 has a WPS button for easy pairing, three RJ-45 Ethernet ports, a power port, and a RESET button.
Download these HX220 setup instructions in PDF format for offline viewing here.
The instructions and screenshots below relate to TP-Link devices, primarily the TP-Link vx230v (supplied by Activ8me).
Depending on the router’s make and model, your router may have slightly different steps.
We recommend searching online for customised instructions for your Wi-Fi router and use them in conjunction with these instructions.
HX220 Setup Instructions (for use as a Wi-Fi Range Extender)
This is referred to as ‘AP mode’ or ‘Access Point Mode’.
Before you begin, ensure your Wi-Fi router is powered on and connected to the internet.
Step 1. Power up the HX220
Connect the HX220 Wi-Fi Extender to power using the power adapter supplied with the unit.
Once the LED is flashing blue, the device should be ready for configuration.
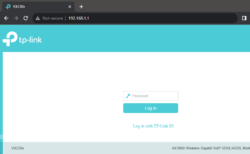
Step 2. Log in to your Wi-Fi router
On a device (like a phone or PC) connected to your Wi-Fi network, use your internet browser to navigate to your router’s home page.
The address is often http://192.168.1.1, but if that address doesn’t work, you can find your router’s gateway address on the sticker on your router.
The username and password to log in to your router’s home page are also printed on the sticker on your router.
(These are often username: ‘admin’ and password: ‘admin’ or ‘password ‘)
The first time you log in to a vx230v, you’ll be asked to choose a password.
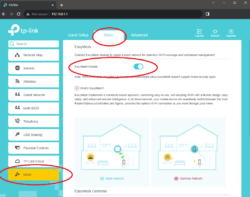
Step 3. (For TP-Link devices) Once logged in, go to Basic > Mesh and make sure EasyMesh is enabled.
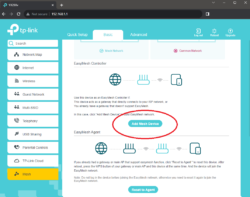
Step 4. Scroll down and click Add Mesh Device
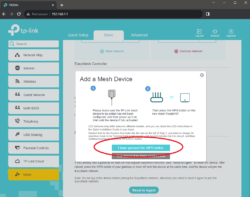
Step 5. Click the WPS button on the back of the HX220, then click ‘I have pressed the WPS button’ on the screen.
Wait 3-5 minutes until it automatically detects and adds the Mesh unit.
Step 6. Once the HX220 has been added successfully, click ‘Finish’ to finish the setup.
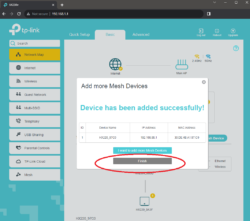
Once completed, the HX220 will be listed on the ‘Network Map’ page, and you can start using the device.
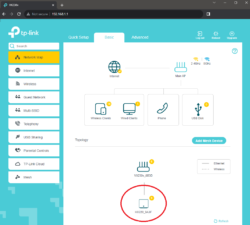
To view the mesh devices and connected clients in the network:
- Go to Basic > Network Map.
- Click the “Main AP” icon to view all mesh devices
- View all connected clients by clicking the “Wired and Wireless Clients” icon.
To manage an EasyMesh device in the network:
Click the Mesh device’s IP Address on the ‘Network Map’ page to redirect to the web management page of this device and view detailed information.
Guide to the LED Colours
The HX220 has an LED light that changes its colour and pattern based on its working status.
| Colour / Pattern | Indication |
| Yellow | The connection quality of the HX220 is normal. |
| Flashing Yellow | The HX220 is starting up or resetting. |
| Flashing Blue | The HX220 is ready for configuration. |
| Fast Flashing Blue | The HX220 is trying to establish a WPS or mesh connection.
This process can take two or more minutes. |
| Blue | The HX220 is set up as a controller (router), or the connection to the controller (router) is good but the internet is unavailable. |
| White | The HX220 is configured, and the internet is available. |
| Flashing White | The HX220 is upgrading the firmware. |
| Flashing Red | The HX220 has lost connection with the controller/router. |
| Red | The HX220 has an issue. |
| Off – No light | Power is off, or the status LED is turned off. |
Further Information
To find out more information on the HX220, you can view more information on the TP-Link website: